You can easily add multimedia elements — including photos, videos, audio files and graphics — to any article or page. This guide explores how to add photographs and photo galleries to your story.
Video, audio and information graphics – including maps, charts, tables, etc. – should be embedded whenever feasible. Do not upload these types of multimedia content to the Media Library without prior permission from your instructor. For more, see Adding video or audio to an article.
But first things first: We can use only content we create ourselves or that we have permission to use. Safe places are the public domain; Creative Commons (Flickr has a lot) with proper crediting and the link; some government photos and logos, and items that people expressly give us permission to use IF they have the right to do that. (Caution: The subject of a photo cannot give us permission to use a photo unless it is also OK with the photographer and, perhaps, the publisher.) Images from Twitter and Faceboook and other social media are not automatically OK. Just because someone puts something on social media does not strip away its copyright protections. The Wiki people have written a detailed description of Creative Commons rules. Our bottom line, though is that as journalists we CREATE media. We do not simply find it. So, for images to contribute to your grade or career, they should be your own.
Optimizing photos for the web
Taking a few simple steps with your images before uploading them to the website can help improve website performance and the speed at which our viewers can access content. See this article from the Institute for Nonprofit News for tips.
How to add photos
Start at the Media Library
- From the left menu in the Dashboard, find Media > Library. These are all of the images that have been uploaded to the Spartan Newsroom.
- The “Add New” allows you to upload new images.
- It may take a moment for your image to upload. Let the computers do their work until a preview of your image appears.
- Once your image is uploaded, it’s time to add caption and credit information. Find the “More Details” button with the Attachment Details, near the right side of your screen.
- Once you click “More Details” you’ll see some additional options. The Caption, Alt Text and Credit fields should be completed before you add any image to a story.
Complete Caption fields
When uploading a photo, fill out these fields as directed (required fields are bolded):
- Title: A word or two to describe what the photo is. By default, when an image is imported, this field is the file name.
- Caption. See also: Writing Great Captions The best captions:
- Explain the action.
- Name the key people in a photo.
- Tell why we’re running the photo (give context).
- Note the important details in the photo. Write captions in present tense. Include the when and where of the photo.
- Alt Text: Text gives viewers a short description of the nature or contents of an image. By writing effective alt text you insure that our news website is accessible to people with visual disabilities.
- Credit: This is the name of the photographer or creator of the visual element. In most cases, it will automatically appear with the image.
- Credit URL: If a URL to an outside link is required, you can create that URL here.
- Organization: The group or entity that provided the photo or for which the photographer or creator works.
- Can distribute? Leave this box unchecked.
Add a photo to your article
Once an image is uploaded to the Media Library with caption information (see above steps), it’s time to place it into your article. There are two ways to add a photo: as Featured Media at the top of your story or manually wherever you want throughout your story.
If you want to add a photo at the top of your story, follow the steps under “Set a photo as Featured Media.” To add a photo in other locations, follow these steps:
Add a photo in locations throughout the story
- Start by uploading your photo to the Media Library and adding caption information (see steps above).
- Go to your article. Add an Image block where you want your image.
- Click “Media Library” within the image block to access the Media Library, locate your photo, click it to select and click the “Select” button.
- By default, your image will run the width of the column (which is usually desired).
- If you get the below message that says “This block has encountered an error and cannot be previewed,” ignore it.
- Save a draft of your article.
- Click “Preview” in the top right. The preview of your article should show the photo as it will appear when published.

Jeremy Steele / MSU School of Journalism
Don’t be concerned if you get this error after you place an image into your article from the Media Library. If you “Save Draft” and then “Preview” your article, you’ll see your image properly displayed.Set a photo as Featured Media
Jeremy Steele / MSU School of Journalism
These articles all have featured images, which appear with excerpt text from the article on the homepage and landing pages for categories, tags and series.Ideally, all news articles will have a photo as Featured Media. You can also use video as the Featured Media.
The Featured Media is used on the website home page, as well as landing pages for categories, tags and series, along with the headline and excerpt text of a news article. The website will automatically crop featured images to the correct size on these pages.
For best visual results use a landscape-shaped image with a width of 1170px.
- Start by uploading your photo to the Media Library and adding caption information (see steps above).
- Go to your article/post. Find the Featured Media module, typically in the lower right corner of the post screen.
- Click “Set Featured Media.”
- Select the desired photo. Click “Set as featured.”
- While the photo will not appear on the edit view of your article, if you preview your article you will see it at the top, running the full width of the screen.
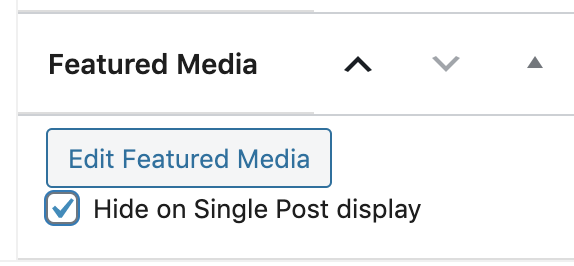
Hiding featured media on the article page
The featured media also automatically is placed at full screen width under the headline at the top of the story.
Sometimes, that results in an image that is so tall, the viewer has to scroll and scroll before finally getting to the first sentence in your story.
That setting can be overridden (so that the featured image is only used on the homepage and landing pages and NOT on the article itself) by checking the box next to “Hide on Single Post Display” at the bottom of the Featured Media module, below the thumbnails of media library photos.
Jeremy Steele / MSU School of Journalism
By checking this box, a user can prevent a featured media from appearing at full size at the top of a news article.You can then use the steps under “Add a photo to locations throughout the story” to place your photo at a smaller size in the desired location.
Add a photo gallery or slideshow
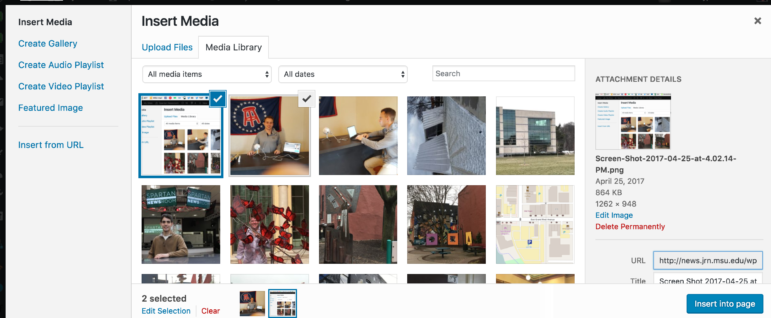
Photo galleries are a very powerful way to tell stories, provided you have some good ones that show a progression through space or time.
- Go the Media Library, upload all of your images and add captions and credits.
- Go to your article/post.
- Add a block where you want your gallery to appear.
- View all types of blocks. There are several options to display a photo gallery. Here are two popular ones:
- A Gallery will show a display of all of the photos. (Works great with 2-5 photos.)
- A Slideshow will show one photo at a time, allowing users to click to view the next image. (A good choice if you have five or more photos.)
- Click on the images you want in your slideshow.
- Click on “Create Gallery.” Then “Insert Gallery”
- You can change the order of the photos by editing your gallery or slideshow.